geo1007-labinstructions
GEO1007 Lab 1 - Web app basics: structure and communication
Introduction
The goal of this first lab assignment is to get a view ‘behind the scenes’ of web sites. The assignment starts with installation of a web server, and a small example web site.
This is used as starting point to:
- Examine the basic structure of a web page (= HTML document), also known as: the HTML DOM (= Document Object Model)
- Analyze the communication between web browser and web server(s)
The material needed for this lab is:
- This guide
- The installation guide for installing Apache Tomcat (web server software) on your laptop
- The contents of the github(https://github.com/bmmeijers/geo1007-2025) repository for this course
The software needed for this assignment is:
- A web browser: Firefox, Chrome or another browser (but it should have Web Developer tools in its menu, for examining the web pages and the communication between browser and web servers)
- The Apache Tomcat version 9 webserver
- A text editor, like: Sublime Text or Notepad++ (or another of your liking)
- Git (version control) installed on your machine (sometimes preinstalled)
- Your own github account
Part A describes the installation and setting-up phase, Part B is the assignment (with questions) itself.
Part A: Setting Up
-
Follow the separate steps in the Apache Tomcat installation guideline to install Apache Tomcat (web server) on your laptop.
Perform this individually, also if you work in a group of two persons. So, everyone should do this installation step on their laptop.
-
Check if you have git installed on your machine. Open up your
Command
Prompt
(Windows) orTerminal(MacOS) and type the commandgit --version. If you get a response, it is installed. If the command is not known, you can install git via this guide. If you are unsure whatgitis, there will be more information later on. -
If you don’t have a
githubaccount, go ahead and create one. -
Navigate to the GEO1007 github page, and log in if necessary. You should see a simple page with directories and files.
💡 Optional Background
If you are unfamiliar with
github, read on.githubis essentially a service for storing, sharing and collaborating on the development of code.gitis the actual version control system used to track and manage changes in code (analogous to track changes on a word processor).githubon the other hand is a service withgitas a central part of its technology. It provides hosting code tracked bygitand much much more! -
From the main
githubpage,forkthe repository to your account as follows:-
Click the
forkdropdown menu, and then click+ Create a new fork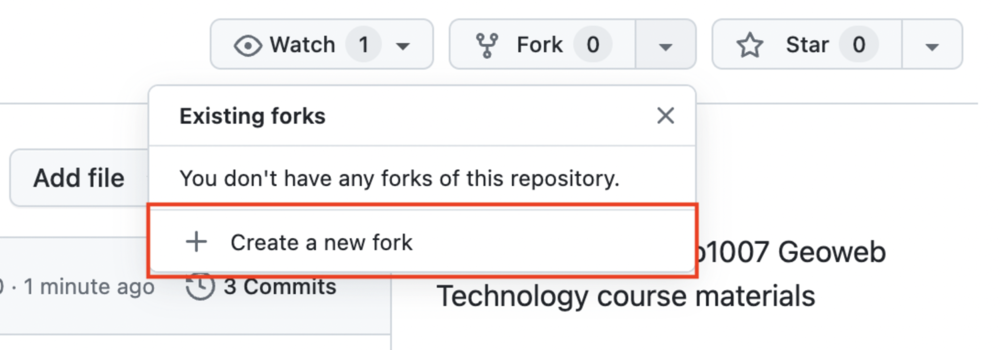
-
In the page that follows, don’t change anything and click
Create Fork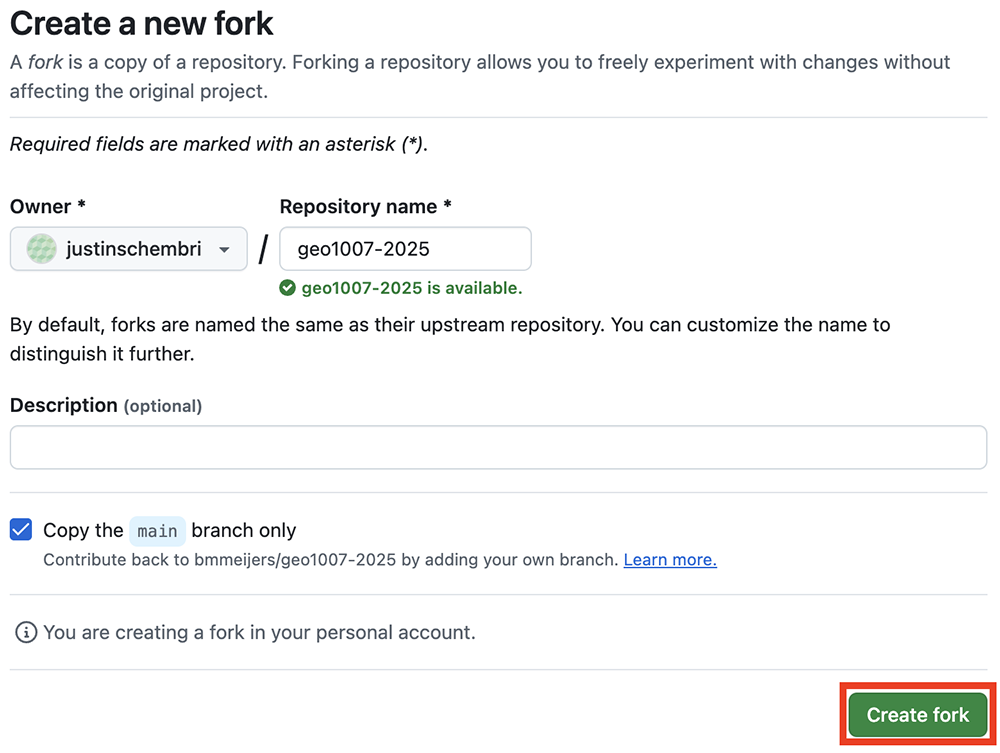
💡 Optional Details
Forking the repository means that you have ‘your own’ copy of the source code now associated with your account. The fork, however, does retain memory of its origin, and you can continue to synchronize changes made to the origin and even contribute your changes to the origin source.
-
-
Now it is time to copy the source code to your local machine. Right now it only exists remotely on the Github’s server. The last step should have redirected you to your copy of the repository we’ll be using. If for some reason it didn’t, navigate to your Github main page, find the newly created
Geo1007-2026repository from the ‘Top Repositories’ list on the left hand side and click on it. -
Click the green ‘Code’ dropdown, select
HTTPSoption and copy the link to the remote repository. The link should look something like this:https://github.com/<yourUsername>/geo1007-2026.git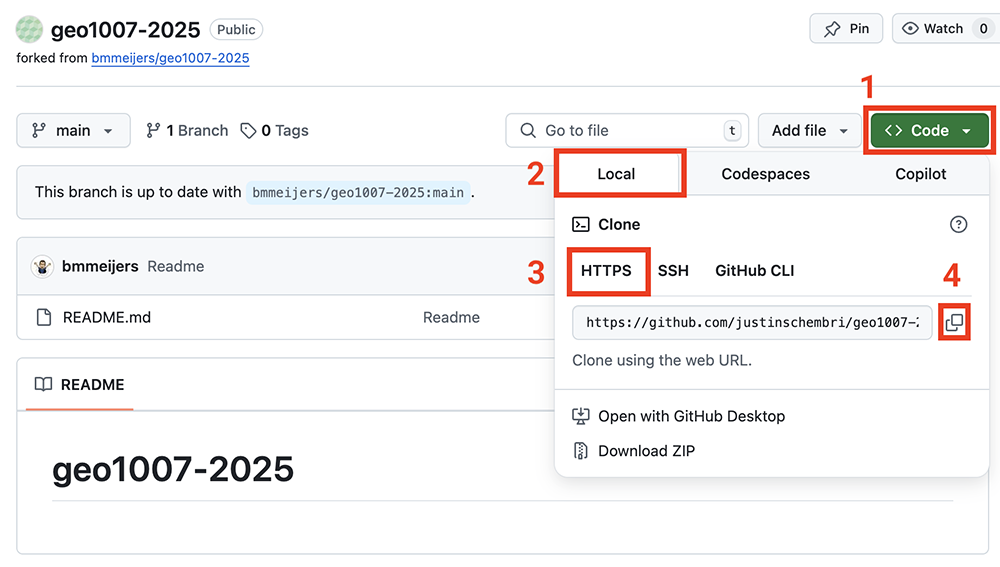
⚠️ Warning
Make double sure you are cloning your forked repository! The link copied in this step contains your username.
-
The code we’re about to clone is going to be used with the Apache Tomcat server you installed earlier. More specifically, we want it in the
webappsdirectory within the Tomcat directory. Lets make sure to copy this into the right location.Open up your
Command Prompt(Windows) orTerminal(MacOS) and navigate to the folder where you installed Tomcat using the command:cd <path/to/tomcat/webapps>.⚠️ Warning
Make sure the path used in the command above is to the /webapps directory. For example, on my (Mac) machine, my path looks like this:
/Users/jschembri/geo1007/apache-tomcat-<version>/webapps. On Windows this could look like:D:\geo1007\apache-tomcat-<version>\webapps. -
Finally, clone the repository from the URL you got at Step 7 earlier, which should look something like this:
git clone https://github.com/<yourUsername>/geo1007-2026.git geowebSome text should appear as your machine downloads and places the source code. The source code should be placed in the local folder
geoweb(under thewebappsfolder, which is the webroot of your webserver, i.e. the place where it serves files from). -
You should now have something like this in your
.../geo1007/apache-tomcat-<version>/webappsdirectory:geo1007/apache-tomcat-<version>/webapps/geoweb/lab1/photoSearch/ geo1007/apache-tomcat-<version>/webapps/geoweb/lab1/_95746143_sciencelondon.jpg geo1007/apache-tomcat-<version>/webapps/geoweb/lab1/index.html -
Now, we start the Apache Tomcat server. From your
Command PromptorTerminal, navigate to thebindirectory in the Tomcat installation and runstartup.bat(Windows) orstartup.sh(Linux/Mac). -
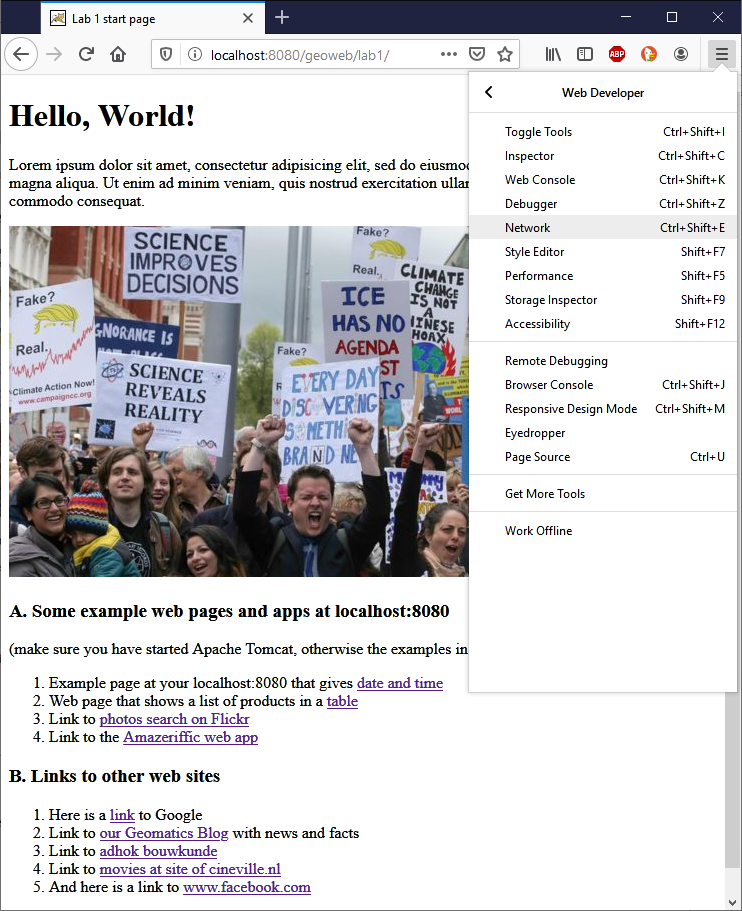
In your web browser enter the web address: http://localhost:8080/geoweb/lab1/, a page should come up:
💡 Optional Background
The file name of this web page is ‘index.html’. Because index.html is the default name for a web site’s start page you can omit it from the web address. (Just try it: http://localhost:8080/geoweb/lab1/index.html has the same effect as typing the shorter web address without index.html).
-
Debug tools: Web Developer tools of your browser
Open the Web Developer tools menu, either via the top menu, or via the menu icon in the toolbar. See figure above, this is how it will look in Firefox.
If you use another web browser, the menu can look slightly different, with different names, for example ‘more tools’ ⇒ ‘developer tools’ in Chrome).
For the assignments the following tools from the Developer menu are important:
-
Inspector: to analyze the structure of a web page
-
Network (monitor): to analyze the network requests that originate from the web site and the responses it receives from (other) web servers
-
Web console: this gives also information about the HTTP requests made, and more importantly: about errors encountered in the HTML or JavaScript code
-
B. Lab Assignments
Assignment Design
These assignments will include a lot of setting up, tweaking, debugging and experimentation with various web-technologies. Putting in the work and getting to the end earns you five of 10 points. You earn these points by inputting all the information required in the Proof of Completition.
The remaining five points are earned through answering some additional questions of which you fill find two kinds: Reflective and Summative.
Questions marked as Reflective do not need answers within the report we expect you to issue at the end. You are expected to do the work, we just want to save you time typing things out. You are just free to do the work however you see fit: taking notes, discussing among your peers, querying an AI: whatever fit your learning style.
Questions marked as Summative do need to be present in your final report. As a general rule, there will be far less of these kinds of questions than reflective ones. The final summative question is where we expect the work, reading and your familiarity with the topic to show. We invite you to be creative with your answers, web-technology is not dogma, and opinions, disagreements and some friction is welcome and encouraged.
Task 1: The structure of a (simple) HTML page
Analyze the structure of the start page (index.html) of http://localhost:8080/geoweb/lab1/
You can do this in two ways:
-
‘Offline’ / via the file system: open index.html in your text editor (e.g. using Notepad++ or Sublime Text) to look at the HTML code itself
-
‘Online’ / via the web browser: open in your browser, and use ‘Inspector’ to see both the page as it appears, and the code that creates it
🤨 Reflective Questions
1a. Can you see the HTML DOM elements (HTML tags) in the page?. These simple tags are the backbone of web technology! There are 14 in total - can you find them all?
1b. What do each of these elements do with respect to rendering things on a the page? Does every tag put “something on the page”?
A good source of information is the Mozilla Developer Network site, but also W3 schools has good information.
The text and tags you have seen become webpages. More specifically, your browser knows how render HTML into a website. In the early days of the internet (sometimes, even now) browsers didn’t agree among themselves on how to render this text and webpages would look and work different. This is why webstandards exist and are so important.
With your text editor of choice make some changes in index.html, for example change the picture for another one of your liking, or type some more meaningful text in the paragraph with Latin ‘filler’ text. Refresh the browser to see the results.
Proof of Completition A. Make a screenshot of your new page and save it for your report to hand in.
Task 2: Network traffic (communication between web browser and web server(s))
Go again with your browser to http://localhost:8080/geoweb/lab1/
There are a number of links on that page:
-
List A. has links to some example web pages and small apps on your own web server (localhost). There are two examples of JSP pages (server-side scripting, part of the Tomcat examples) and an example that is JavaScript-based (uses client-side scripting, based on example from the book by Purewal ‘Learning Web App Development’).
-
List B. has links to web sites that are not on your localhost server, and are obviously much more complex.
Proof of Completition: B. When considering the reflective questions below, make a screenshot (for the report) of (part of) the requests as displayed in the Network monitor saw in the reflective questions a-c.
🤨 Reflective Questions
Choose two links from List A. and two links from List B (so four in total) and use the Web developer tools especially the Network monitor) of your browser to analyze what happens when you open that link.
Answer for each of the chosen links separately (so four times in total) the following questions:
2a. Do you see the HTTP or HTTPS requests in the network monitor? 2b. What are the contents of a request? Its not just the HTML payload, but all those headers too? Headers are a core part of web-technology - can you imagine why they’re useful? Note, for the Firefox browser you can find information about what is in the columns: **status, method, file, domain, cause, (content) type, etc. here: https://developer.mozilla.org/en-US/docs/Tools/Network_Monitor For other browsers the terminology is most of the time the same.
2c. What ‘(content) types’ do these requests have (these indicate what kind of response is received by the browser as result of a request)? And what do they mean?
2d. Which ‘status codes’ do you see for these requests, and what do they mean?
Task 3: Analyze a web site that has a map on it as part of the content
Find on the internet a web site that has a map as part of it. The choice is up to you, except: do not choose Google Maps, Bing Maps or another specialized map application (and also not a page that ‘embeds’ such an advanced application to show a map).
For example: https://www.anwb.nl/verkeer/nederland/verkeersverwachting, https://www.knmi.nl/home, https://www.buienradar.nl/nederland/wind/actuele-wind are good examples (or a travel site with hiking or bicycling routes, or the site of an organization with contact information containing a map, or ...).
Proof of Completition: C. When considering the reflective questions below, make a screenshot (for the report) of (part of) the requests.
🤨 Reflective Questions
Analyze the chosen web site (by using the Web developer tools of Firefox / Chrome / other browser) and find out: 3a. Is there anything “specialised” about how the “map” is served by the webserver, compared to the general purpose websites you saw earlier? 3b. What is the content type of the map as sent back by the web server (the response)?
📝 Summative Question 1 — Web page structure and rendering Expectations: Between 1 and 2 pages of text, images optional but encouraged. Less is more!
Question: Explain how a web page is built and displayed in the browser. In your answer, describe how HTML structure (DOM) is interpreted and rendered, and explain how changes you made in Task 1 affected the final page. Grading (5 points): 0.5 point — Basic idea that HTML is displayed in a browser 1 points — Mentions HTML structure (tags/elements) and rendering 1.5 points — Explains the DOM as a structured representation of the page 2 points — Connects DOM structure to rendering behavior using an example from Task 1 2.5 points — Clear, correct explanation showing how changes in HTML directly affect what is displayed, using accurate terminology
📝 Summative Question 2 — Web communication and network behavior Expectations: Between 1 and 2 pages of text, images optional but encouraged. Less is more!
Question: Describe what happens when a browser loads a web page, focusing on communication between browser and server. Use your observations from the Network Monitor to explain requests, responses, headers, status codes, and content types. Include at least one concrete example from your analysis. Grading (5 points): 0.5 point — Mentions that the browser sends requests and receives responses 1 points — Identifies HTTP/HTTPS and basic request-response cycle 1.5 points — Includes at least one of: headers, status codes, or content types correctly 2 points — Uses a concrete example from the Network Monitor 2.5 points — Clear explanation of multiple components (headers, status codes, content types) and how they work together in loading a page
What to submit
What to include in this lab1 part of your report:
A report which includes:
☐ Proof of Completition A ☐ Proof of Completition B ☐ Proof of Completition C ☐ Summative Question 1 ☐ Summative Question 2
Submit the work for this lab1 together with the work for lab2.
Submission date and time is on Brightspace.
Also, do not forget to put your name(s) and student number(s) on the first page of the report.