geo1007-labinstructions
GEO1007 - Installation guideline for Apache Tomcat
The text below will explain how to install the web server software, in our case we will use Apache Tomcat as web server software.
We will use Tomcat as basis for the later labs as well (i.e. extend it with GeoServer and FROST).
⚠️ Warning
Because Geoserver is not (yet) compatible with the latest versions of Tomcat, it is important to install version 9!
This guideline is written for Windows users. If you have a Mac or use Linux, the same download and installation steps should work as well (but details might differ).
If you run into problems, contact the supervisors.
Check if you do not already have a webserver running locally
Open Firefox (or another web browser) and type http://localhost:8080/ in the address bar. The web browser should respond with a message, that indicates it is unable to connect. If this is not happening, but you see a web page for example, ask one of the supervisors for advice.
Preparation
On your C:\, D:\ drive or, for Mac, your home directory create a new folder with the name geo1007.
Download and installation of Apache Tomcat
Apache Tomcat comes in several versions. Older versions will are maintained, too, in an effort to keep backward compatibility. For our work we’ll be using version 9.0.117.
Follow this link:
-
From the Download bar on the left hand side, select “Tomcat 9”,
-
Under ‘Core’: Click on the first download possibility, named ‘zip’, which will start the download of the file:
apache-tomcat-9.0.117.zip -
Download and unzip this file, and move the resulting
apache-tomcat-9.0.117folder to the foldergeo1007, so you will have the following directory structure:
geo1007
└── apache-tomcat-9.0.117
    ├── bin/
    ├── BUILDING.txt
    ├── conf/
    ├── CONTRIBUTING.md
    ├── lib/
    ├── LICENSE
    ├── logs/
    ├── NOTICE
    ├── README.md
    ├── RELEASE-NOTES
    ├── RUNNING.txt
    ├── temp/
    ├── webapps/
    └── work/
Setup Tweaks
Windows Users
Go to the apache-tomcat-9.0.117/bin folder, and look for the file startup.bat
(if you do not see the complete filename (including the .bat extension), make sure to check the ‘File name extensions’ checkbox in the ‘View’ tab of the File explorer menu bar).
With a text editor (e.g. Notepad++, Sublime Text, etc.) open the file startup.bat.
Go to the end of that file and add the statement pause as last line, and on a line of its own (after :end), like so:
:end
pause
This helps capturing problems, because it ensures that the
startup.bat script does not close immediately after an error or warning.
Linux / MacOS Users
Under Mac/Linux it will be necessary to make the startup scripts executable, you can do so by opening a terminal window and:
cd <full path>/geo1007/apache-tomcat-9.0.117/bin #put your actual path
chmod 755 *.sh
You need to tell your machine where to look for the Tomcat server. Open up a terminal window:
cd ~ #changes directory to your home folder
echo "CATALINA_BASE=<full path>/geo1007/apache-tomcat-9.0.117/bin" >> .bash_profile # put your actual path
Finally, Apple will likely try to ‘block’ the running of the script for security purposes. If when double-clicking your receive an similar to the below:

Then head over to your System Settings and allow the app script to run (you will have to do this for both startup.sh and shutdown.sh):

Starting Apache Tomcat
On Windows: run (by double clicking) startup.bat.
On Mac, you have two options:
- In the terminal, navigate to
apache-tomcat-9.0.117/bin, and run the command:./catalina.sh run; this ensures the Tomcat runs in the foreground, - Double click
startup.sh; Apache will run in the background (you won’t see any of the logs or error messages though!)
💡 Linux/MacOS Note
(Mac/Linux only) Double clicking
startup.shmight just open the file in a text editor. To solve, right click and open the file with theTerminal(Applications → Utilities → Terminal.app).
There are now two possible situations:
First possible outcome: You get an error message that the JRE_HOME environment variable is not defined or not defined correctly.
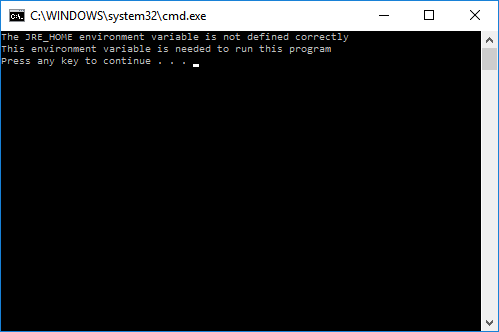
⚠️ If you get such an error message, you have to do some additional set-up steps, see the “Appendix: Java (JRE) troubleshooting” information at the end of the document. Otherwise skip this Appendix and continue.
Second possible outcome: Everything is OK, when you do not see the error message and the script continues to open a second command line window, with content like:
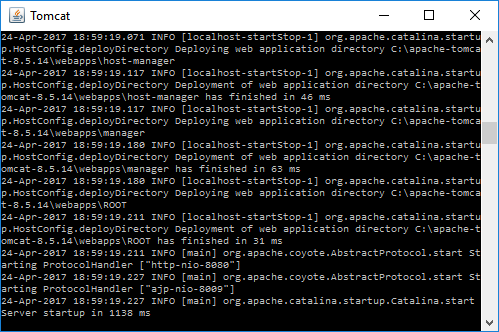
Note that this window must stay open to keep Apache Tomcat running.
You will see messages from the server process, but you will not interact with the server via this window.
(When by mistake you close this window, just run startup.bat again to restart Apache Tomcat.)
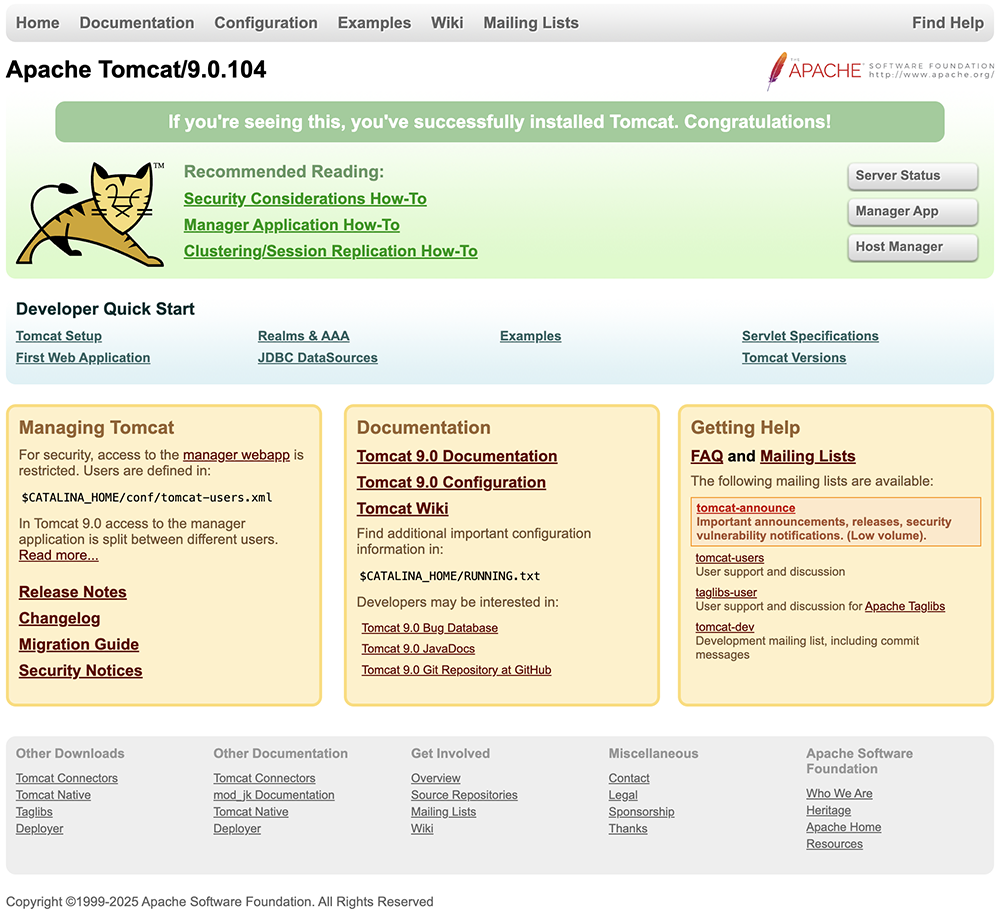
To be sure that the web server is started and works: Open Firefox or another web browser and type http://localhost:8080/ in the address bar.
You should see the following:
You now have a functional web server running on your laptop 🎉 ! For this server everything works the same as with a ‘real’ web server, with the important exception that you cannot access the server process from other computers via the internet.
The webserver is accessible:
- via IP address / port combination at: http://127.0.0.1:8080/, or
- with the base URL and the port: http://localhost:8080/ (using the Domain Name System to resolve the name to the (reserved) IP address).
Note, 8080 is the default port number that the Tomcat server process uses, normally a HTTP server binds to (uses by default) port 80.
Stopping Apache Tomcat
You can stop Apache Tomcat by running bin/shutdown.bat (Windows) or bin/shutdown.sh (Mac/Linux), or by simply closing the command line window.
Configuring the Manager App
It can come in handy to see what the Tomcat server process is doing, by accessing its Manager App inside a web browser. For this, it is necessary to define a user, with a username and password.
Place the following inside apache-tomcat-<version>/conf/tomcat-users.xml (replace all other content with your text editor).
<?xml version="1.0" encoding="UTF-8"?>
<tomcat-users xmlns="http://tomcat.apache.org/xml"
              xmlns:xsi="http://www.w3.org/2001/XMLSchema-instance"
              xsi:schemaLocation="http://tomcat.apache.org/xml tomcat-users.xsd" version="1.0">
  <role rolename="manager-gui"/>
  <user username="admin" password="admin" roles="manager-gui"/>
</tomcat-users>
Start (or restart) the Tomcat server after making this modification.
Now, visit your local server (i.e. open http://localhost:8080/ in your web browser) and click on the button Manager App.
The web browser should supply a dialog to enter a username and password (which are configured above to: admin and admin respectively).
After entering the credentials, you can see which applications are available to access via the web server.
Appendix Java (JRE = Java Runtime Environment) troubleshooting
If you get an error message about the JRE_HOME environment variable, this can mean two things:
- You have Java installed, but no JRE_HOME environment variable or an incorrect one, or
- You don’t have JRE installed.
Check if and where (in what directory) you have JRE installed.
The fastest is by looking in C:\Program Files or in C:\Program Files (x86).
If you do not have JRE, download and install it from a trustworthy site:
- https://jdk.java.net/26/ (last version is JDK 26)
- https://adoptium.net/temurin/releases/ (latest version is JDK26)
- https://www.oracle.com/java/technologies/downloads/
❓JDK? JRE? I’m confused!
And we don’t blame you! The Java Development Kit (JDK) includes the Java Runtime Environment (JRE). Think of the JDK as a complete toolbox for Java developers — it lets you both develop and run Java programs. The JRE, on the other hand, is just what you need to run Java applications — no development tools included.
So why does this matter? Without a JRE, we can’t run Java-based applications — like Apache Tomcat. That’s why installing the JDK is often the safer bet: it gives you everything you need.
Downloading JRE from Oracle may require registering for an Oracle account (presently, April 2025, not the case) which you may not like. Open source JDKs and JREs are also available and one can use them without registering (the first 2 links mentioned above).
The next step is: defining the environment variable JRE_HOME.
In Windows this is done via the method described below.
(For Mac or Linux the steps will differ).
Set JRE_HOME (Windows 7/8/10)
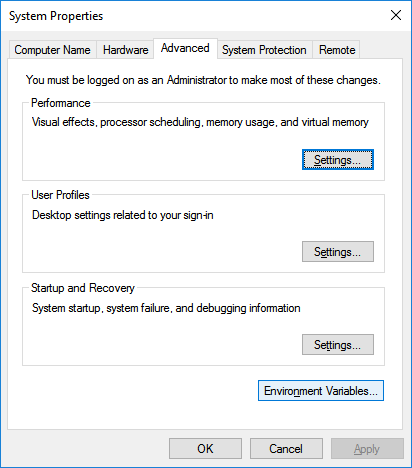
Navigate to Control Panel, System, Advanced System Settings.
Click the Environment Variables button.
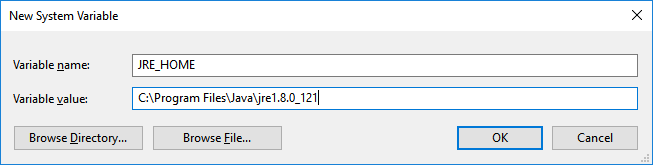
Under System Variables, click New (see figure below):
Enter as the variable name: JRE_HOME
Enter as the variable value: the JRE folder.
In the figure below, the setting is: C:\Program Files\java\jre1.8.0_121, but the version
and directory path varies a lot between computers, so check carefully
where the JRE directory is located on your own system (and what is its
exact name).
Click OK a couple of times and the setting should be done.
Try to start Apache Tomcat again with startup.bat (after starting a
new terminal, cmd). If you get the same error as before, check first if
there are no typos in the settings (both variable name and value) for
JRE_HOME, and if the directory path is correct.
For older versions of Windows you might need to restart your computer (depends on your Windows version). If nothing helps, ask the supervisors for support.
Installing JRE (Mac)
For installing Java OpenJDK on macOS, the following website presents a tutorial: https://solarianprogrammer.com/2018/09/28/installing-openjdk-macos/.
In addition, a nice instruction video can be found here.
Alternatively, here is a step by step instruction:
- Download and install the JDK Version 24
.dmgpackages from here (n.b. ARM installers for Apple Silicon, x64 for Intel Silicon), - This will install the JDK at
/Library/Java/JavaVirtualMachines/jdk-<version>.jdk/Contents/Home - Open the
Terminaland type the commandcd <full path here>/geo1007/apache-tomcat-9.0.117/bin touch setenv.sh echo "JRE_HOME=<full JRE dir>/jdk-<version>.jdk/Contents/Home" >> setenv.sh